Monday, September 30, 2013

Day 273) Nail art caterpillar

A few weeks ago I bought this polish:


Invogue Feather Effect On the money


I consider polishes like this as special effect top coats.
Yes, you can wear them on their own but just like a glitter polish/topcoat it will take you at least 3 time consuming layers.
Therefore I'm not really a fan and this one was still laying around ready to be swatcht.
I also thought it was over budget but as it is an exact copy of the Sally Hansen Fuzzy Coat Fuzz sea and half the price of the Sally Hansen's I just went for it :D


Sally Hansen Fuzzy Coat Fuzz Sea


Both polishes are a clear polish with yellow and blue strips (barcodes).
I don't have a swatch of the Sally Hansen's (but there are plenty to find on Google).

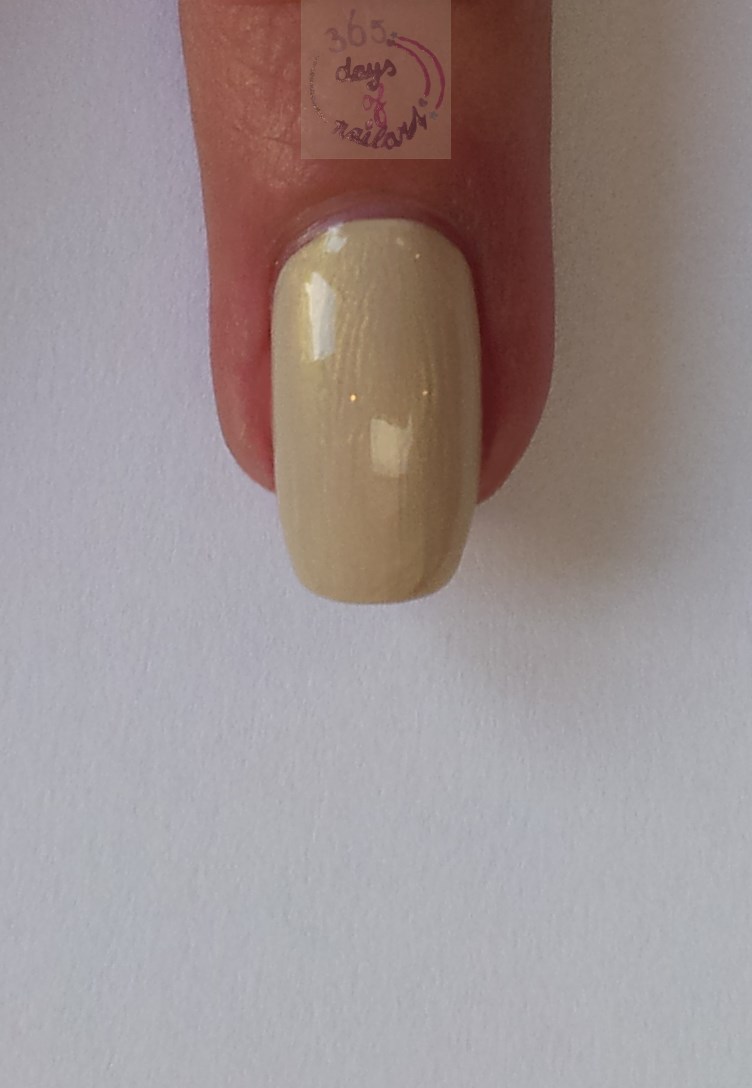
Here is a swatch of the Invogue Feather Effect On the money:


The close-up picture shows the true colors of the strips.
The second picture shows an accurate look of the polish as the eye wants to mix the colors and make it look like a sea color (turquoise).
I really love the end look. I would definitely wear this one again (and that means a lot coming from my mouth :D).
What surprised me was the watery clear coat. Although the pictures above show 3 to 4 layers of polish. The end result is still thin and they dried quite quickly. Which is different from some of the glitter polishes I own; not drying fast and a thick end result which makes the nails look like gel or acrylics.

Didn't know what to do with it though. Nail art wise that is.
After a lot of thinking I came to a Caterpillar as these little guys have a fuzzy coat as well.
I chose to do an easy and simple design, using a striper brush to make black circles and outline the design with white.

Sunday, September 29, 2013

Day 272) Nail art Halloween

Today the first Halloween nailart.
Halloween is actually something we don't really know in the Netherlands.
Except from some movies on TV and some stuff you can buy at stores it is a day that passes just like any other.
A part of the Netherlands does celebrate Sint Maarten which is November 11th.
Children go by people's doors holding a lampion/lantern (which used to be a pumpkin with candle, nowadays it's a paper thing with battery light) and they have to sing a song.
After finishing the song they will receive a treat (this used to be a penny or fruits, nowadays it's candy).
 
Blabla blabla.
Let's get to the nail art!
 
What's there to see:
- Starry sky
- Clouds
- Moon
-Bats
- Castle towers


Saturday, September 28, 2013

Day 271) Nail art fall gradient (inspired by a scarf)

Today a very simple and easy nail art.
The weather in the Netherlands is getting a bit colder and guess who's the first one with a laryngitis and cold...yes, of coure it's ME!
 
Today's nail art is inspired by this scarf:


It's a beige scarf with a dark purple print on the end sides from the brand Promiss
 
So, I started with a beige base (Catrice Ultimate Nail Lacquer Limited Edition Eve in Bloom C01 Bloomynous) and sponged a purple polish (Catrice Ultimate Nail Lacquer Limited Edition Eve in Bloom C02 Floralilac) from the tip up creating a gradient.


Friday, September 27, 2013

Day 270) Marbled fall nails

There are a lot of techniques which can be used to get that marbled look (saran wrap, dry marbling, sponging).
Today I used the sponging technique.
I simply applied 3 blobs of polish on the nail sized sponge (a reddish orange, yellow and green) and sponged it on the nails.
I pushed the sponge several times on the nail, while turning and placing the sponge in different ways.
I had to do this twice to get full opacity.

After applying topcoat and some drying time.
I decided to make a leaf accent nail.
Started with free handing the leaf outline but totaly messed up (pssst I'm not telling).
Then I decided to make everything around the leaf brown and...problem solved (yes, of course this has been absolutely on purpose).

 
Polishes used:
- Vernis POP FLUO no 01 (yellow)
- Catrice Ultimate Nail Lacquer 690 Fred Said Red (reddish orange)
- Catrice Ultimate Nail Lacquer Limited Edition Neo Geisha 05 Planet Tokyo
- Rimmel London 60 seconds 550 Major Brown
 

Thursday, September 26, 2013

Day 269) Abstract nails (fall colors)

Each week we get advertisement leaflets.
They are not only interesting for finding bargains but also for finding inspiration.
The colors for today's nail art are inspired by a leaflet from a clothing store.
I looked at those fall colors together and just wanted to make an easy abstract nail art with it.

So, here it is:


After the basecoat I applied striping tape by making an "X"

I used the 4 colors from the leaflet to fill up each area.
Then I removed the striping tape and used a striper brush and brown polish to make the "X" again with polish.

Polishes used:
- Catrice Ultimate Nail Lacquer Limited Edition Eve in Bloom C01 Bloomynous (beige)
- Catrice Ultimate Nail Lacquer Limited Edition Eve in Bloom C02 Floralilac (plum)
- Etos Long Lasting Nailpolish 124 (teal)
- NYC 208 Pier 17 (cobalt blue)
- Rimmel London 60 seconds 550 Major Brown (dark brown)

Wednesday, September 25, 2013

Day 268) Forest path nail art

Up front: Today's nail art looks way better in real life than on the pictures :(
I was thinking about those wall papers of a forrest path in fall. I really love these wall papers and like to look at them any time of the year.
I guess I used wrong polishes for the nail art as they are metallic and chrome and without natural light it's just all catching the light and dissapearing in the pictures.

Nevertheless, I have a tutorial.

1) Start with applying a neutral color (Catrice Ultimate Nail Lacquer Limited Edition Eve in Bloom - C01 Bloomynous)


2) Use a sponge and bronze color to sponge the nail (Catrice Ultimate Nail Lacquer - 910 Oh my Goldness!)


3) Use a striper brush and dark brown polish to paint the trees (Rimmel London 60 seconds - 550 Major Brown)


4) Use a flat or one stroke brush and some chromes or maybe just normal colors (red, green, yellow, brown, orange) to make the leaves on the trees. Only around the cuticles and starting from half way.
Use the brush as a dotting tool (dipping).
- NYC 018 Bronze metal
- OPI mini Muir Muir on the Wall


 Too bad the leaves are almost invisible on the picture. Maybe I can get a better pic tomorrow in the sun.

Thanks for reading!

Tuesday, September 24, 2013

Day 267) If I were a rich girl...(Give-away)

I've reached 500+ followers!
Hooray! Hooray! Cheers! Smiling face! Happy face! Jumping in the air...you get it right?!

And because you are the lovely people that are following me, I'm having another give-away to say thank you so much for reading, commenting, following and most of all to keep me going.

If I were a rich girl...
...I would have bought each one of you a gift and send it to you.
But I'm sorry this is not the case (sad face).

The Give-away:
Although the nail industry isn't cheap I do have some low-budget favorites which I think are rich products.


I have 5 sets of these rich nail products.
I'm using a random picker so everyone will have the same chance to win.
How to win:
Look, I'm already happy that you are following me here. So, I'm not doing a Rafflecopter asking you to join on other media or making comments you don't feel like.
But I won't just give it away either. I want to make sure you've (at least) read this post and are interested in the work I've done so far.
***I want you to comment on this post by choosing one of my nail arts that has your love (I won't accept comments like "I love all you nail arts", although I know you mean well and it is sweet!)***

Now, I'm not expecting you to look back on all my previous posts (I wouldn't do that either ;D).
If you want to see all my nail arts at once, just go to my Pinterest board (this is not me asking you to follow me on Pinterest. But me trying to make it easy for you).
Pinterest

Good luck! And I'm looking forward to read which one you like most!

Now, for today's nail art.

If I were a rich girl...
Rich girls just love:
- Diamonds (Silver/holo glitter with rhinestones)
- Gold (Gold glitter with golden inlay heart and ring shape)
- Money (Black polish as base. With a silver glitter striper I've made the text: "Rich girl". With a 
  striper brush and gold glitter I've made valuta signs)
- Pearls (Pearly white polish (not opaque) as base, finished with pearl-shell top coat. On the tip I
  applied some half Pearls)
Oh, and between my fingers a piece of jewelry :D

Monday, September 23, 2013

Day 266) Be loud!

Essence came out with another trend edition "Be loud!"
The name says it all: Essence is calling all beauties to be loud, be free, be you!
Today's generation is independent, strong and assertive and this power needs to be expressed with a cool look too.
Camouflage prints and expressive colours are all the rage.

This trend edition comes with 4 nail polishes and a special effect topper (glitter graffiti):
From left to right:
- 01 Riot @ ♥
- 02 Orange is the new black
- 03 Riot grrr-een
- 04 Like a stone in the wall
- 01 Not punky, nor funky
I don't have the graffiti topper yet, but I will get it and probably show it around the Holidays (Christmas).
I do have single nail swatches of the other polishes:
 
The polishes are a little jelly which makes them almost opaque in 1 coat, but I've used two in the picture above.
I'm not sure if I dare to wear the darker colours plain...it isn't really my taste. But I guess that if you like such colours you'll love them.
To my surprise I totally loved the orange. Again not my colour but it looked great (bright, daring and fits quite good with my skin tone).
Well, and of course the dark purple is just fab but I love purples, so that's no surprise.
I've chosen to do single nail swatches because I took more time for the nail art ☺
Hope you like it! I used to following image of this trend edition as my inspiration:
 
I started with making camouflage nails.
I've used a striper brush and the following polishes:
- Catrice Ultimate Nail Lacquer Limited Edition Eve in Bloom - C01 Bloomynous
- Catrice Ultimate Natural Nail Lacquer Limited Edition NEONaturals - C05 Have a good day
- Essence Trend Edition Be loud! - 03 Riot grrr-een
- Essence Trend Edition Be loud! - 04 Like a stone in the wall
Then with the same striper brush and a white polish I've made the letters "BE LOUD!"


Simular to the image I wanted to create the same camouflage effect in the letters.
Polishes used:
- Catrice Ultimate Nudes - 02 Don't tell Mademoiselle!
- Catrice Ultimate Nail LAcquer - 850 Aretha's R.E.S.P.I.N.K
- Essence Trend Edition Be loud! - 01 Riot @ ♥
- Essence Trend Edition Be loud! - 02 Orange is the new black
 

After this I applied the black around the letters and made some other little details from the image; spray, smiley, buttons with stars, arrow and music note.


To all my readers: BE LOUD! BE PROUD! BE YOU!
 

Sunday, September 22, 2013

Day 265) Fall leaves nail art

Fall leaves? Again!
Yes, been there but not done yet ;D
 
Today some fall leaves and a swirl design which stands for the wind.


Saturday, September 21, 2013

Day 264) Nail art rain

Fall and rain...In the Netherlands they are united.
I don't have a driving license so I am bound to walk or take my bike and therefore I hate rain...flat hair, smokey eyes (and not on purpose), wet and cold clothes, wet socks...brrrr.

Today's nail art is about rain but in a sweet way :D
I've painted umbrella's upside down on the tips and on the ring I did an accent nail with little duckies swimming in the umbrella.
The rain I've made by making dots and then drag the polish from the dot with a toothpick.


Friday, September 20, 2013

Day 263) Nail art hedgehog

Today I have an incomplete tutorial because some of my (really many) pictures failed.
Still, I believe that you lovelies will be able to follow it anyways...so, here it is!

Step 1:
Make your own nail foil/decal (I've explained this before but will do it again)


Material:
- Plastic zipper bag (or something simular)
- Topcoat (Seche Vite)
- Brown nail polish (Rimmel 550 Major Brown)


Apply a layer of topcoat on the zipper bag and let it dry for a bit.


Apply brown polish on top of the layer of topcoat.
Let it dry completely as you proceed with the next steps.


Step 2:
Apply a light polish as base on the nail(s) (white, beige, nude, pink, peach...you get the idea).

Step 3:
Use a nail art brush and black polish to make the body of the hedgehog. Make the snout red.
Okay this is a step which is pretty important and the pictures were just all blurred.
Luckily the final picture shows the design as well, so I didn't bother to do it again. But if you've read this post and still wish to have a picture of just the body...let me know and I will!

Step 4:
Use your DIY nail foil/decal to make the spines.


Material:
- Scissors
- DIY nail foil/decal (from step 1)


Get the decal from the zipper bag (I use my nails but you can also use tweezers).
Cut it into tiny strips:


Step 5:
Apply a layer of topcoat on the nail. Use this as glue for the strips (spines). Start with the top row, moving down in rows towards the body. Apply some topcoat again between the rows.
N.B. I used a rhinestone picker for picking up the strips but you can also use a wet pencil or wet cotton swab.
Outcome is best when you don't apply the strips flat but let them stick up a little.

I hope my explanation is clearly enough. If not, please don't hesitate to contact me.


 GOOD LUCK!

Thursday, September 19, 2013

Day 262) Abstract fall nail art

Today I have an abstract fall nail art simular to this nail art I did before.
You can also find the tutorial at this previous post.

Material for this nail art:
- Fall colors
- Striping tape
- Scissors
- Nail art brush

Start with applying one of your colors as a base.
Let it dry completely before applying the striping tape.
Use the nail art brush to give the stripes a different color.

Wednesday, September 18, 2013

Day 261) Nail art fly agaric/fly amanita

I keep on going with the fall nail arts that are in my head.
But if you have any requests to make something else or tutorials...please let me know!!!
 
Today Amanita muscaria, commonly known as the fly agaric or fly manita.
The toadstool is hand painted, the rest is a two color sponged mani (metallic/holo).


Tuesday, September 17, 2013

Day 260) Nail art fall tree

Today I have a tutorial for an easy fall tree.
 
Step 1:
Start with applying a white or beige color
 
Step 2:

Material: Striper brush and brown polish
Paint a tree on the nail using the striper brush and brown polish
 
Step 3:
 
Material: Dottingtool and red, orange, yellow and green polish
Use the dottingtool and the colors above to make colorful dots around the branches and at the trunk; these dots are going to be the colored leaves.

 Finished look:
 

Monday, September 16, 2013

Day 259) Nail art fall scene

I'm not a huge fall fan.
Coldness, wind and rain is really not my thing!
But I do like pumpkins, acorns, chestnuts, colored leaves, candles etc.
It brings some warmth in the cold fall months.
 
Today I have nail art on which I tried to show some of the good parts of fall.

Sunday, September 15, 2013

Day 258) Nail art gold holo glitter transfer foil dots

Today has been a very exhausting day.
Not only am I very tired, I also have a bad headache.
Nothing special today; just a nice beginner nail art.
 
First a swatch of a nail polish from the new limited edition of Pupa Milano:

Pupa Milano Iridescent nail polish 002 (blue)
 
 
This nail polish has a small brush. Positive is that this gives you the chance to polish perfect. Negative is that you'll need more strokes to cover the nail.
This polish has a perfect coverage with only 1 coat!!! And it dries very quickly.
The color can be compared to a duo chrome polish. Main color is blue accompanied by purple.
Both colors have a little glitter/glint.
Shown in normal position and without any special light the nail is blue with purple accents at the cuticles.
I'm in love with this color!!
And the picture doesn't do it justice at all (but as it's fall so the picture is taken indoors and with artificial light.
 
Now, for the nail art...something simple!
I bought some golden holo gitter transfer foil a while ago and I've really been wanting to try it out:
 
Golden holo glitter transfer foil + transfer foil glue
 
I used a dottingtool to make glue dots on the Nail:
 

The glue is milky at first and ready for use as it turns clear.
Then you can apply a little piece of transfer foil on the nail (printed side up!!) and gently rub it.
The transfer foil is transferred to the nail on the spots where you've painted the glue.